
Tuesday, May 27, 2008
Thursday, May 22, 2008

Tuesday, May 20, 2008
wouldnt it be cool...
image comics is coming out with a book entitled studio space. it's a book about the studios of the comic book industry's hot artists and about how they got their start. one article i read was about when Jim Lee (batman:hush, wild c.a.t.s.) was starting, he rented a studio apartment with a couple of his friends and basically it was a room with a whole bunch of their drafting tables.
as an ambition, i would love to rent out a place with you and many of our artist friends where we can all hang out and get some work done! not anytime soon, as i doubt none of us have the money so far, but it would be really cool to actually have our own studio...
as an ambition, i would love to rent out a place with you and many of our artist friends where we can all hang out and get some work done! not anytime soon, as i doubt none of us have the money so far, but it would be really cool to actually have our own studio...


Monday, May 19, 2008
Character Development: Thumbnail Tutorial Part 1
Here is my thumbnail creation technique. The basic philosophy is that you can mold random shapes to form a more distinct shape to use for character development or other concept art projects. I.e. I also use this shape technique to come up with vehicle designs or prop designs, like weapons or a futuristic lunch box.
Silhouettes are great for concept art because they don't restrict you to conform to a specific design; in my honest opinion, I believe they lend even more to letting your imagination flow. Also it is great practice to see things in shapes and form and not the little details that make up inside.
#1: Let your mind loose. It doesn't matter what shape you make. Random shapes add up to making up new shapes in later steps. Scribbles are great. The more random or unidentifiable the shapes are, the better!
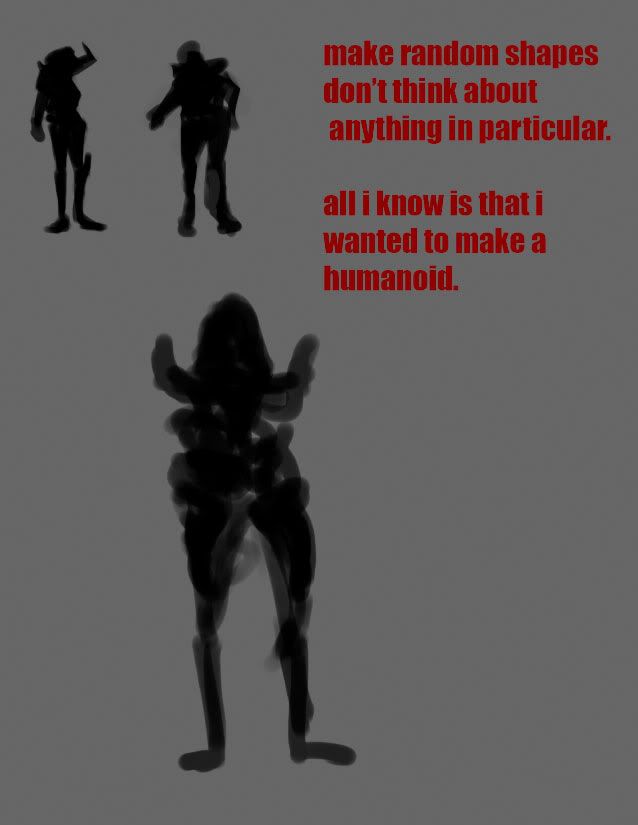
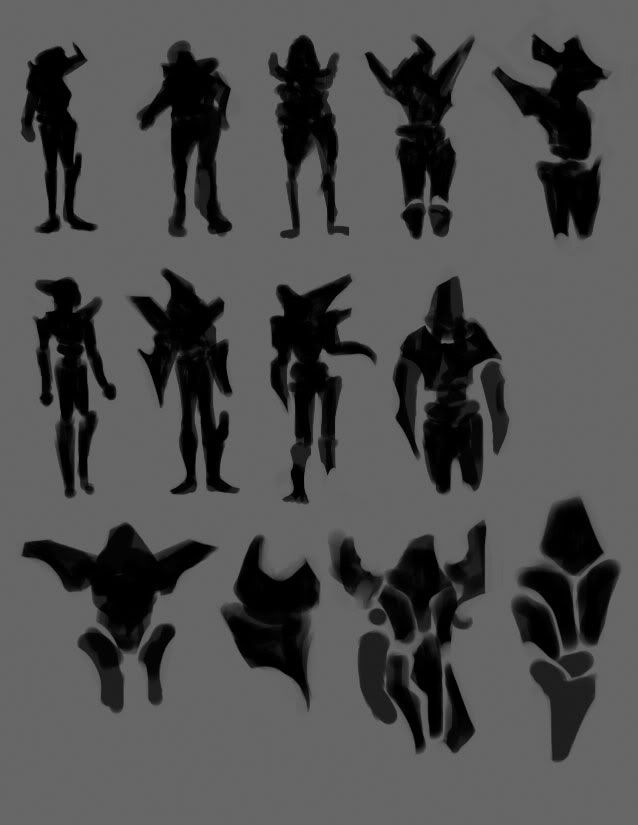
#2: Here are a collection of the random shapes that I have made. Know that this isn't our final thumbnails page (in fact, there isn't really a final one. The more pages, the merrier!). They are unidentifiable in terms of what kind of character this is going to be. We can tell that it will have two legs, but is it female? Male? A creature of some sort? We'll never know...
#3: Putting them together. This is where it gets kind of technical. I took a shape (a) I liked from the previous canvas and pasted it on a new one. I copied another one (b) as well and pasted that onto its own layer.
Shape (b)'s layer should be on multiply. This will make it darker, but if you use the level option (cntrl+L) and move the right hand arrow to the left, it will make it "transparent".
Hint: The multiply blending mode makes all white in that layer transparent.
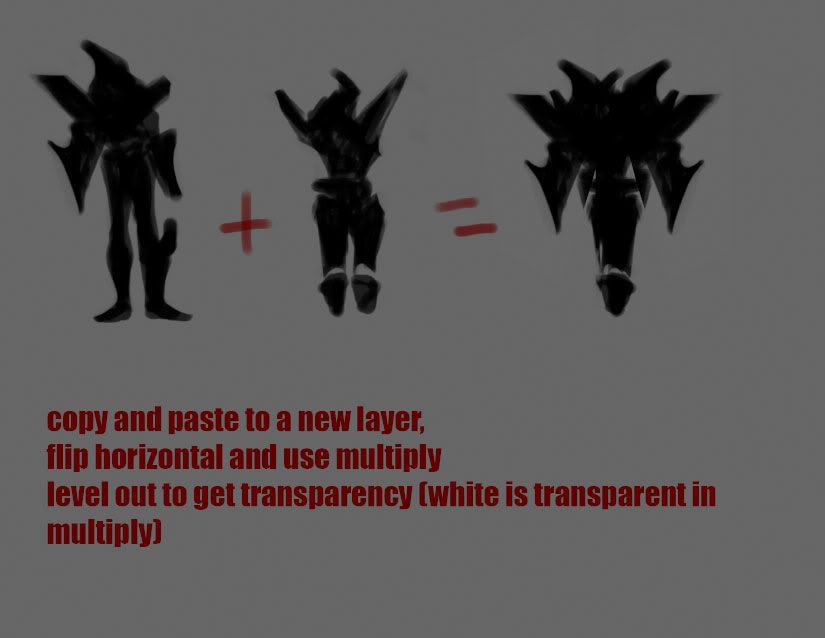
Duplicate, transform, flip horizontal and put it all together. Do whatever your heart desires. The main point of this step is the multiply blending option and how it opens brand new shapes for you.
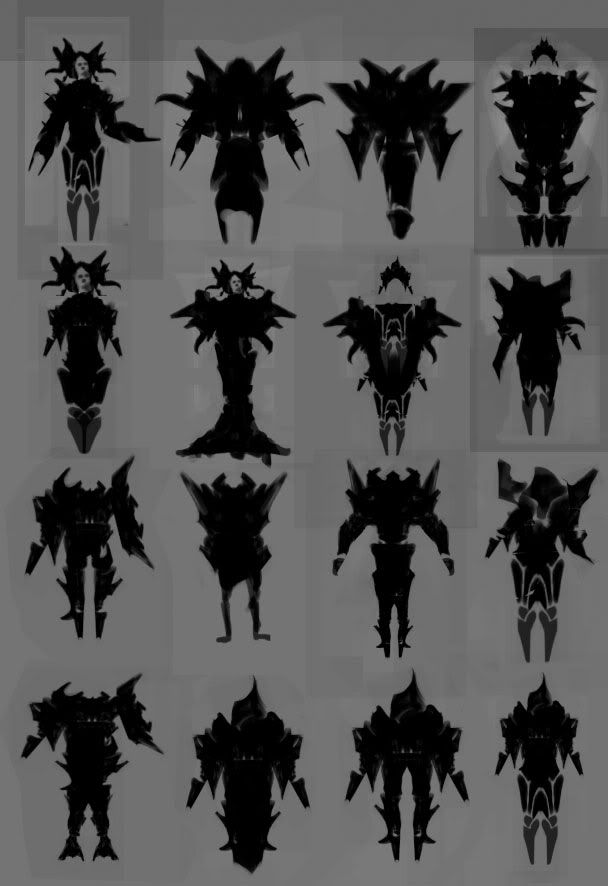
#4: Character ideation. Repeating step 3 numerous times has let me form brand new shapes from previous canvas. In here I was focused more into narrowing down my direction but yet still did not restrict myself from what it might be like. Also, know that you are never restricted to do anything on this phase of your work flow. Anything goes - warp tool, painting on top of the shapes some more, customized brushes, etc. etc.
Silhouettes are great for concept art because they don't restrict you to conform to a specific design; in my honest opinion, I believe they lend even more to letting your imagination flow. Also it is great practice to see things in shapes and form and not the little details that make up inside.
#1: Let your mind loose. It doesn't matter what shape you make. Random shapes add up to making up new shapes in later steps. Scribbles are great. The more random or unidentifiable the shapes are, the better!
#2: Here are a collection of the random shapes that I have made. Know that this isn't our final thumbnails page (in fact, there isn't really a final one. The more pages, the merrier!). They are unidentifiable in terms of what kind of character this is going to be. We can tell that it will have two legs, but is it female? Male? A creature of some sort? We'll never know...
#3: Putting them together. This is where it gets kind of technical. I took a shape (a) I liked from the previous canvas and pasted it on a new one. I copied another one (b) as well and pasted that onto its own layer.
Shape (b)'s layer should be on multiply. This will make it darker, but if you use the level option (cntrl+L) and move the right hand arrow to the left, it will make it "transparent".
Hint: The multiply blending mode makes all white in that layer transparent.
Duplicate, transform, flip horizontal and put it all together. Do whatever your heart desires. The main point of this step is the multiply blending option and how it opens brand new shapes for you.
#4: Character ideation. Repeating step 3 numerous times has let me form brand new shapes from previous canvas. In here I was focused more into narrowing down my direction but yet still did not restrict myself from what it might be like. Also, know that you are never restricted to do anything on this phase of your work flow. Anything goes - warp tool, painting on top of the shapes some more, customized brushes, etc. etc.
Thursday, May 8, 2008
EVIL BUDDAH UPDATE

SO this is my update, for a little bit more about the character.
I have to do much more research for the ornamentation on the armor,
It should be an asian/barbaric style, pre-chinese ming yan etc... what all the dynasties are.
I am thinking of something in between Mongolian with a island touch and the 88 heroes (chinese saga).
Tuesday, May 6, 2008
OMG
look at what i discovered:
http://www.characterdesigns.com/index.php?sitepage=home
http://illustration.org/
http://www.posemaniacs.com/blog/

go here for more: http://www.conceptart.org/forums/showthread.php?t=109381
http://www.characterdesigns.com/index.php?sitepage=home
http://illustration.org/
http://www.posemaniacs.com/blog/
go here for more: http://www.conceptart.org/forums/showthread.php?t=109381
Friday, May 2, 2008


Subscribe to:
Posts (Atom)